Wednesday, December 15, 2021

go tools

 As developer we constantly use tools that let us go faster in our daily tasks, not only go faster also we have to write code with a good quality, because we need to write thinking in the next developer that will have to touch the code, so always choose explicit instead implicit, keep the things simple and Try to not repeat yourself (DRY). In this long way we always continue learning and improving our way of writing code in Go language, some of this tools  I listed here:


go get / go install (Go tools)


This cli command lets you get a dependency and install it  in your GO_PATH. In the last version of go (1.17.0), “go get/install” was redesigned with modules, and improved usability of it, which will help speed up the process of getting users up to speed.[2] 


With go get your will update your dependency and edit go.mod and go.sum. In the best practice of golang they advise to generally not try to consume or edit go.mod and go.sum directly because this should be timeless for the foreseeable future, also it's hard for a human to fully understand the dependency graph by reading a go.mod file. Also with go get you could remove dependencies, the command looks like “go get example.com/theirmodule@none”[2]


Using go tools to get your dependencies your requirements remain consistent and the content of your go.mod file is valid. If you need to search for packages you might find useful, you should query here: https://pkg.go.dev/


“Go mod init “ lets you initialize a new module, and when you are using conventions this ensures it’s available to others via Go tools. Each directory is considered its own package, and each file has its own package declaration line. One repository could have one module or multiple modules (decentralized publishing), the best practice is to have one module by repository because it’s better for upgrade, and maintenance is simpler.[1] 


A module could have many packages inside. When Go sees that a package is named main it knows the package should be considered a binary, and should be compiled into an executable file, instead of a library designed to be used in another program.  When Go sees a function named main inside a package named main, it knows the main function is the first function it should run. This is known as a program’s entry point. GOPATH is an environment variable where you define where the go binary is. Don't worry if you are not familiar with the GOPATH, because using modules replaces its usage.[3]


“go list -m all” list all dependencies(-m = modules ) with -u list the modules that need an upgrade  and  “go list -m -versions github.com/lib/pq” list all versions for the lib/pq module. “go mod tidy”: is used for removing unnecessary or unused dependencies.“go install”, let you install the application locally.


GVM (go version manager) [5]

require bison package at least, to install this:  sudo apt-get install bison or sudo pacman -S bison

The easiest way of install this tools, is with the script installer, you could use bash or zsh:


The output should looks like: Cloning from https://github.com/moovweb/gvm.git to /home/jennifer/.gvm
Created profile for existing install of Go at /usr/local/go
Installed GVM v1.0.22
Please restart your terminal session or to get started right away run
`source /home/jennifer/.gvm/scripts/gvm`

Gvm commands:

➜  ~ gvm list all # to list all go version on my laptop
➜  ~ gvm install go1.14.1 # to install a new go version
➜  ~ gvm use go1.17.4 # to use a go version in the current terminal session


➜  ~ cd new_project #to use many gopath directories, new_project will be added to GO_PATH
➜  ~ gvm pkgset create -local
➜  ~ gvm pkgset use --local 


Ayu [6]

Ayu is an extension for visual studio code IDE, this extension implements three themes: Ayu Dark, Ayu Light and Ayu Mirage, this themes lets you highlight the go syntax, as I spent long hours with IDE on my screen it’s comfortable to my eyes to have set Ayu Mirage as theme.


Golines

Golines is a go app that lets you short the length of lines in a file or in all the files in a directory. To install:  go install github.com/segmentio/golines@latest and to use:  golines [paths to format] you could configure this command in visual studio code to be executed every time you save the file (Run on Save plugin [7]).

Go test and  Go mock

Is part of the Go language core so you do not need to define your own interface and mock classes. You do not need to depend on a third party library. The creators of Go foresaw the need to mock outbound HTTP requests a long time ago, and included an API in the standard library.  The API is provided in the package httptest, and there are many examples of how to use it, including not only in the httptest package’s own Godoc example. Unit tests are useful for the maintenance of code and checking if the application it’s ok after we upgrade our dependencies, and let us make sure our packages and modules are working correctly. “go test all” runs the tests of all direct and indirect dependencies of your module, which is one way to validate that your current combination of versions work together[8][9]. If you are curious as to why a particular module is showing up in your go.mod, you can run “go mod why -m <module>” to answer that question. Other useful tools for inspecting requirements and versions include “go mod graph”

Some recommendations: when you have to update an API in a golang module you should create a new path for the new version in case the contract API is modified in some parameters. Choose to use interfaces to make a contract for Request and Response API’s, reserve time to do unit tests, and functional tests with a coverage over 70%, use “go test -v -cover” to check this[10]. With these tools and taking into account these recommendations we built better software, that will keep back compatibility with older versions, and make for the next developers an easy task or more comfortable the maintenance of the project.


[1] https://go.dev/doc/modules/managing-source

[2] https://go.dev/doc/modules/managing-dependencies

[3] https://go.dev/doc/modules/developing#workflow

[4] https://go.dev/blog/module-compatibility

[5] https://github.com/moovweb/gvm

[6] https://github.com/ayu-theme/vscode-ayu

[7] https://marketplace.visualstudio.com/items?itemName=emeraldwalk.RunOnSave

[8] https://github.com/golang/go/wiki/Modules#faqs--gomod-and-gosum

[9] https://github.com/golang/go/wiki/Modules#how-to-upgrade-and-downgrade-dependencies

[10] https://gitlab.intraway.com/jennifer.maldonado/gpon-ipv4-simulator-config/tree/master/dhcp_templates


PD: sorry if there are any typos or grammar mistakes. Suggestions for corrections are accepted.

Tuesday, December 14, 2021

avoiding CORS ups..

bad practices

How  to  avoid CORS error on google-chrome-stable version >= 96.0.4664.93

1 - execute google chrome by cli in this way:

google-chrome --disable-web-security --user-data-dir=/tmp


2 - access to this URL in the new chrome opened: chrome://flags/#reduced-referrer-granularity

and disable web security.

search by: 

"

Block insecure private network requests.

Prevents non-secure contexts from making sub-resource requests to more-private IP addresses. An IP address IP1 is more private than IP2 if 1) IP1 is localhost and IP2 is not, or 2) IP1 is private and IP2 is public. This is a first step towards full enforcement of CORS-RFC1918: https://wicg.github.io/cors-rfc1918 – Mac, Windows, Linux, Chrome OS, Android


"


See Also:

- https://developers.google.com/web/updates/2020/07/referrer-policy-new-chrome-default
- https://chromestatus.com/feature/6251880185331712


Sunday, November 28, 2021

git-worktree


 Since 2015 git added a command git-worktree. This command could be used  when you have a repository  and each branch represent an old Versions of the code, one feature_branch or simple using the main branch.  This command generate a new tree, and you can avoid doing checkout on branches every  time you have to do an urgent bug fix or edit without doing changes on the main tree locally. 

Advantages.

  •     the Time spent by you IDE to reindex the switched branch, so you save a little of Time If you use some jetbrains IDE or eclipse.
  •     No need to fetch ,if you don't want to.
  •     By each tree you Will have a new project in the IDE .
  •     This command use a new directory un your file system, AND use the same .git/config file.
  •     You could compare the code by tree, branches, and directories.


In the old fashion way you Will have to clone each repo in diferents directories, and check or set manually  same config on .git/config,  each directory Will be a project in you IDE. In this way you only could compare by directory and by branch.

Another way was use git stash to save what are you working on, and do the checkout to the branch version  with the bug on production, this way you have a Lot of context switch (to make an hotfix) , cos you Will need to do the reindex on you IDE (in case you use eclipse or some jetbrains IDE ), and later checkout to your branch_feature, unstash, AND again reindex, and always don't forget to clean cache!

Some examples:


(base) ┌─[j3nnn1@caracas] - [~/git/tools] - [Sun Nov 28, 13:26]
└─[$] <git:(master)> git worktree add /home/j3nnn1/git/tools2
Preparing worktree (new branch 'tools2')
Updating files: 100% (2887/2887), done.
HEAD is now at db7534a Update paquetes.txt


When hotfix is ready and the fix it’s in production:


└─[$] <git:(master)> git worktree remove /home/j3nnn1/git/tools2


$ git worktree add <path> <branch>


With -d  throwaway working tree


git worktree prune 


To clean up any stale administrative files.


git worktree lock


To not delete, remove, or prune when gc.worktreePruneExpire passes.


List all trees


└─[$] <git:(master)> git worktree list
/home/j3nnn1/git/tools   db7534a [master]
/home/j3nnn1/git/tools2  db7534a [tools2]


Thursday, November 25, 2021

chezmoi saving your config files versioned


pacman -Syu chezmoi

chezmoi init (make a new dir  ~/.local/share/chezmoi)

chezmoi add ~/.bashrc

chezmoi [add|edit|update]  ~/.bashrc

chezmoi cd (~/.local/share/chezmoi)

git remote add origin https://github.com/j3nnn1/dotfiles.git

git branch -M main

git push -u origin main 


Additional config:

git config pull.ff true

git config pull.rebase true

and that's all.

Sunday, November 21, 2021

udev events, making an udev rule and debugging rules.


udev is a device manager for the linux kernel.

when you connect some device (pendrive, camera, microphone) on a linux machine, you have a daemon listen to events that are fired when the kernel register a new device. All devices are mapped to a file on /dev so you could check some info about the device with this command:

udevadm info -a -n  /dev/DEVICE_NAME

i.e.: udevadm info -a -n  /dev/ttyUSB2

udevadm info -a -n  /dev/ttyUSB2 | grep '{devpath}' | head -n 1
udevadm info -a -n  /dev/ttyUSB2 | grep '{idVendor}' | head -n 1
udevadm info -a -n  /dev/ttyUSB2 | grep '{idProduct}' | head -n 1
udevadm info -a -n  /dev/ttyUSB2 | grep '{serial}' | head -n 1


knowing the device info we could make a rule based in the information and execute a new action: make a file, make a symlink or execute a script. For example I want to create a rule that match with the attributes devpath, idVendor, idProduct, serial and generate a new symlink.

we need to create a file into:

/etc/udev/rules.d/99-some-rule.rules

- in this file we need to use "" in the values.
- each line is a rule.
- each line has many or one attribute and one action. When the attributes matched  the action is executed, that's all.
- if you edit or create a new rule, you need to load and trigger all rules again.

udevadm control --reload-rules && udevadm trigger


- so sometimes is tricky check why some rule is not executed. For debug you have:

    - udevadm test /devices/platform/soc/3f980000.usb/usb1/1-1/1-1.3/1-1.3:1.0/ttyUSB0/tty/ttyUSB0

      the devices path you could obtain with the comand udevadm info.

    - udevadm monitor

      show the events that are fired.
    
    - udevadm control --log-priority=debug

      set the environment on debug mode.

    - udevadm test $(udevadm info --query=path --name=ttyUSB0)
      
      test all rules associated to the device name ttyUSB0

- when you have an syntax error on some rules file, this will appear in the logs:
    - journalctl -f

- restart service:
    - systemctl restart systemd-udevd
 

- kernel messages
    - dmesg

- example: file called 99-new-rule.rules:

SUBSYSTEM=="tty", ATTRS{idVendor}=="1a86", ATTRS{idProduct}=="7523", ATTRS{devpath}=="1.2", ATTRS{bcdDevice}=="0264", SYMLINK+="FANCY_NAME"

The 99 number indicated the priority for execution. in this case would be the last one to execute.

It's important to put double quotes instead single quote.

Friday, October 29, 2021

Using Cloud Native Buildpacks and paketo to improve software as service.


In a changing world technology is constantly evolving, so it is necessary to take action to stay tuned about it and bring the best solution to our customers. Every day are found security issues on the operative system[11] and are necessary to do patches, path to libraries, and so on. For this it is necessary to update app images in an easy, standard,  performantly, and secure way, because containers are industry standard today. 


It is a very common task in development that we have to create a docker image from a source code, and more usual is that the image needs to be ready for a cloud environment. In this case we don't have a specific way to do it, there is no standard, but exists best practices to generate a app images from our source code:


-  [Small size image] You need an image with a small size. 


- [Multistage] You need to generate the images in two stages or more depending on the language, for example in Go you need a first stage to get all things needed by the app (dependencies, compiler, external libraries) and later when you compiled the source code  to later you could copy that binary to a minimized image. (Could be an alpine image with a small size).


- [Reduce Layers] You need to do an Optimize dockerfile, for example take into account how to build the layer to make it more performante[1]. Always we need to reduce the number of layers, design ephemeral containers, avoid storing application data and any other building tools that we don’t need to run or execute the application.


Besides having tools like Docker Linter https://hadolint.github.io/hadolint/ often we spent a lot of time doing the image and refactoring dockerfile to reach a small image size, with the best practices, and more efficient. This need was detected by the pivotal1 and heroku2  approximately in the year 2011 as a result of all the complexity that can be had to set up images without having standards or guidelines. They defined Buildpack3 this concept of buildpacks was broadly adopted by CloudFoundry, Google App Engine, GitLab, Knative, Deis, and more.


Buildpacks from pivotal and Buildpacks from heroku are slightly different, so in 2018 both companies join force to present to the cnfc  (Cloud native computing foundation)4 a project based on Buildpacks but not the same. 


Once that cnfc approved this project, they created buildpack.io as a standard[5] and coined it “Cloud Native buildpacks”, to unify the buildpack ecosystems from pivotal y heroku and a higher level abstraction for building container images. In the same year Using the knowledge of the many years of experience with buildpacks, the CloudFoundry buildpack engineering team created the Paketo.io project which is based on former CloudFoundry Buildpacks (CNB).


So what are Buildpack / Cloud Native Buildpack? is a kind of app, tool or open source scripts that transforms your application source code into an image, and the image container is more secure. Buildpacks (CNB) ensure apps meet security and compliance requirements by CNCF, perform upgrades with minimal effort and intervention. 


Inclusive with less network data transfer because this does the update by layer or stacks. Cloud Native Buildpacks embrace modern container standards, such as the OCI image format and they take advantage of the latest capabilities of these standards, such as cross-repository blob mounting and image layer "rebasing" on Docker API v2 registries[7] 

“rebasable” images or image layer “rebasing” is related to ABI compatibility[6] It is the contract provided by OS vendors that guarantees that software doesn’t need to be rebuilt when security patches are applied to the OS layers. It makes “rebasable” image layers safe to rebase. So let you update the Os layer without a risk of sort incompatibility to crash your app.


On the other hand, Is very easy to use when the code is in a good shape or has a good smell. But when it is not, you’ll need to do a refactor of your code. The best way to use Buildpack is with pack:


There are many form of install pack[8] the one that I used was by command line or the tab with the script install where you only need to execute this line with sudo or a user with grant to write on /usr/local/bin and that’s it:


(curl -sSL "https://github.com/buildpacks/pack/releases/download/v0.15.1/pack-v0.15.1-linux.tgz" | sudo tar -C /usr/local/bin/ --no-same-owner -xzv pack)


To use pack we should have docker installed in our machine, basically pack autodetect what kind of image we need to build looking into the code, based on that pack choose a builder  which is an image that bundles all the bits and information on how to build your apps, such as buildpacks, an implementation of the lifecycle[9](a kind of implementation of Cloud Native Buildpacks specs from CNCF) it's still in beta. In summary you have to download or write the code, change directory to the app directory or root path.

# clone the repo
git clone https://github.com/buildpacks/samples

# go to the app directory
cd samples/apps/java-maven


You could also see in samples/buildpacks/java-maven how is writed the definition or specification (CNB10) with a toml extension file, and how will be apply to choose the right builder, in the directory stack we could see some Dockerfiles with the instructions or recipe with the tools to build an image, every stack has a Dockerfile definition.


And execute the next line:


# build the app
pack build myapp --builder cnbs/sample-builder:bionic


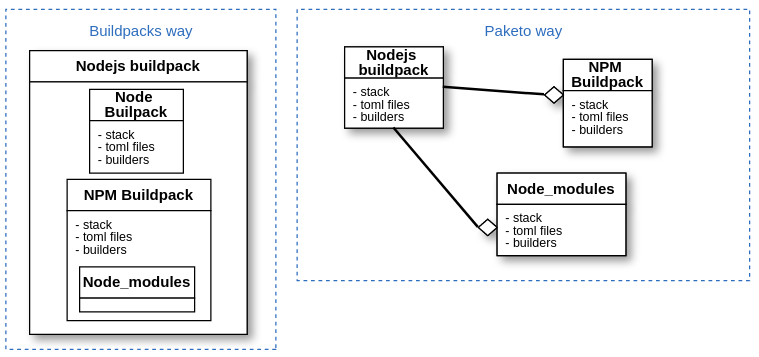
And that’s it, you’ll be using Buildpacks. The buildpacks (CNB[10]) specification and the file structure could be a little complex when the project grows up. You could have Buildpacks inside another Buildpacks definition, long buildpacks files, a lot of toml files in a hierarchical way and a lot Dockerfiles, so in the same time Vmware (Pivotal and CloudFoundry)  made paketo where  Paketo slogan is Let's Pack, Push and Deploy!


    Paketo is a new way to build buildpacks, redefine the relations between the components in a modular way, using composition in dependencies where each element has a single responsibility. This make Buildpacks easy to maintain and to do contribution, on others words is like a refactor from cloudfoundry buildpacks to avoid monolithic buildpacks and Dockerfiles: 


 written using different programming languages, for different purposes.


Paketo uses a base image called tiny which is effectively distroless and provides a method to more rapidly deploy application code in a way that eliminates the need to create customizations for each deployment platform. This eliminates the need for the container community to reinvent many times  the same wheels over again. The separation of concerns they provide, makes the developer’s life easier as they can focus more in the application and product development.


Paketo Buildpacks needs docker and pack installed, the community has done a lot of samples to give it a try ( https://github.com/paketo-buildpacks/samples) and they encourage you to contribute to it. Paketo Buildpacks could be the next generation or an evolution from docker (Dockerfiles) and let us focus on the business problems we’d like to solve. Let's Pack, Push and Deploy!

Referencias.

[1] https://run.pivotal.io/

[2] https://www.heroku.com/

[3] https://buildpacks.io/

[4] https://www.cncf.io/

[5] https://github.com/buildpacks/spec/blob/main/buildpack.md

[6] https://en.wikipedia.org/wiki/Application_binary_interface

[7] https://buildpacks.io/docs/app-journey/

[8] https://buildpacks.io/docs/tools/pack/

[9] https://github.com/buildpacks/lifecycle/releases

[10] Cloud native buildpacks

[11] https://www.researchgate.net/publication/315468931_A_Study_of_Security_Vulnerabilities_on_Docker_Hub

[12] https://blog.codecentric.de/en/2020/11/buildpacks-spring-boot/

[13] https://paketo.io/docs/


Sorry for any grammatical or spelling mistakes

hugs 

j3nnn1 (:


https://kubevela.io/ and  https://github.com/oam-dev/spec last 2021 was elected as sandbox project from cncf. kubevela keep focus on application approach instead of the implementation. oam is the specification or standard.